
TL;DR:
- Proper necklace layering requires varied lengths, contrasting textures, and a unifying metal tone.
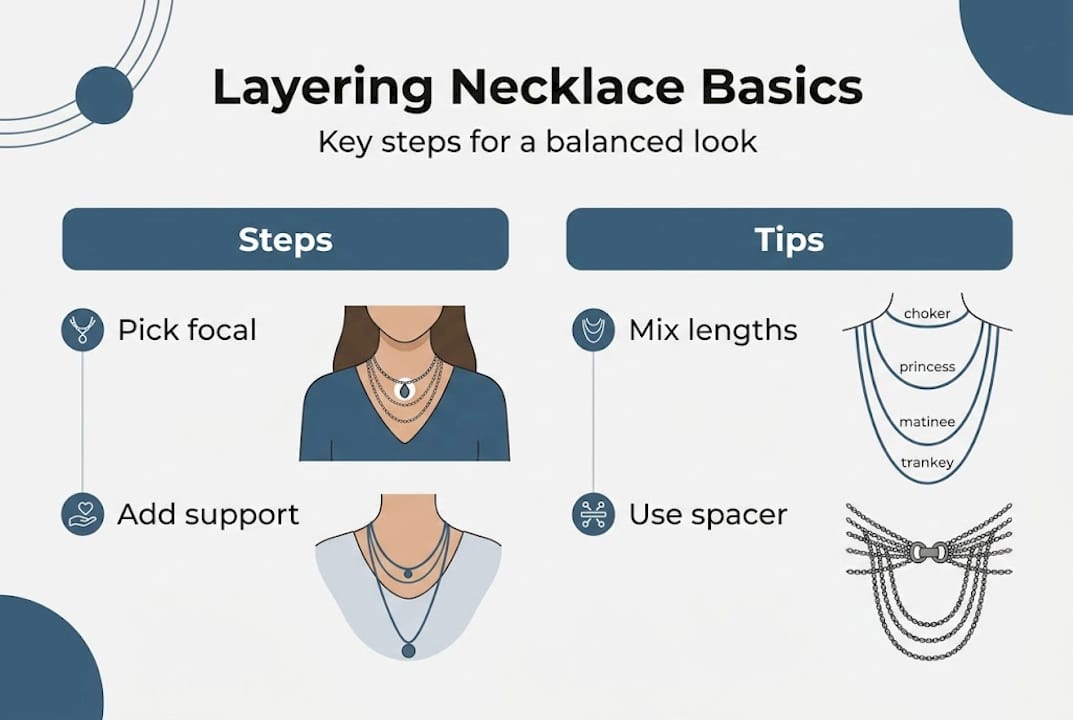
- Start with a focal piece, support with simpler strands, and layer from shortest to longest.
- Confidence and intentionality, rather than strict rules, define a stylish layered necklace look.
Tangled chains, mismatched metals, and a necklace stack that looks more chaotic than chic — sound familiar? You pull on three necklaces before heading out, glance in the mirror, and everything bunches together in a way that feels more frustrating than fashionable. Here at Malibu Vibes Jewelry, we’ve watched thousands of women transform this exact struggle into their most complimented accessory moment. Layering necklaces is genuinely one of the most powerful styling tools you have. This guide walks you through a practical, step-by-step workflow — from picking the right pieces to locking in a polished finish — so every layer you add works for you, not against you.
Table of Contents
- What you need for necklace layering success
- Step-by-step workflow for layering necklaces
- Troubleshooting: Common layering mistakes and how to fix them
- Verifying your layered look: Style checks and confidence boosters
- A stylist’s honest take: Layering jewelry beyond the rulebook
- Elevate your layering game with Malibu Vibes Jewelry
- Frequently asked questions
Key Takeaways
| Point | Details |
|---|---|
| Layering needs principles | Focus on proportion and texture instead of strict rules to create a polished look. |
| Limit tangling risk | Aim for four layers max, and use tools like spacers or extenders for more complex stacks. |
| Embrace individual expression | Layer necklaces to showcase your personality—mixing metals and textures adds depth. |
| Troubleshoot common issues | Fix tangling, clutter, or mismatch with quick styling checks and expert recommendations. |
| Confidence tops the workflow | The best layered looks reflect your style and comfort, not just technical perfection. |
What you need for necklace layering success
Before you stack a single chain, it helps to understand what actually makes layering work. Think of it like building an outfit: you wouldn’t throw on five statement pieces without any thought. The same logic applies here.
Necklace length and spacing matter most. The golden rule is a minimum 2-inch difference between each layer. Standard length groupings look like this:
| Length | Name | Sits at |
|---|---|---|
| 14–16 in | Choker/collar | Base of neck |
| 18 in | Princess | Collarbone |
| 20–22 in | Matinee | Upper chest |
| 24–30 in | Opera/rope | Mid chest |
When each piece occupies its own visual lane, your eye reads them as intentional — not tangled. Explore necklace types for women to see how different styles fit within these length categories.
Texture and thickness create contrast. A delicate cable chain paired with a chunky link chain creates depth. A flat herringbone beside a beaded strand adds visual variety. Without contrast, same-weight necklaces blend into each other and look like one confusing mass of metal.
Essential tools to keep on hand:
- Necklace spacers (hold chains apart at the clasp)
- Extender chains (adjust length on the fly)
- Multi-strand clasps (combine several necklaces into one clasp point)
- Small lobster clasps for connecting pieces creatively
Understanding jewelry layering basics gives you a foundation that makes these tools click into place.
For style cohesion, stick to a unifying element — one metal tone, one color story, or one theme like nature-inspired pendants. You don’t need to match everything, but one common thread ties the look together. As Vogue puts it, there are no strict rules but certain principles ensure polish over clutter.
Minimalist vs. statement layering at a glance:
| Style | Chain count | Texture | Focal point |
|---|---|---|---|
| Minimalist | 2–3 delicate chains | Similar weight | One small pendant |
| Statement | 3–5 mixed chains | High contrast | Bold pendant or charm |
Pro Tip: Start with just two necklaces before adding a third. Once those two feel balanced and comfortable, layer on the next piece. Building gradually prevents the “too much at once” overwhelm.
Step-by-step workflow for layering necklaces
With your materials ready, it’s time to move into the layering workflow itself — here’s how to execute each step for standout results.
Step 1: Choose your focal necklace first. This is your anchor piece. It should be the most eye-catching item in the stack — a pendant with a gemstone, a bold chain, or a meaningful charm. Everything else will support this piece, not compete with it.
Step 2: Select supporting strands. Your supporting necklaces should be simpler and thinner than your focal piece. Think dainty gold chains, simple pearl strands, or a subtle bar necklace. They frame the focal piece without stealing the spotlight.
Step 3: Arrange by length before putting them on. Lay all necklaces flat on a surface, ordered from shortest to longest. This lets you check for visual balance and catch any duplicates in length before the chains are around your neck.
Step 4: Put on the shortest necklace first. Always dress from the neck down. The shortest goes on first, then each longer piece layers below it. This keeps them from tangling as you fasten each clasp.
Step 5: Secure with a layering tool if needed. For three or more necklaces, a necklace spacer clipped near the clasp area keeps chains separated and avoids tangling. According to Glamour, tangling is inevitable with more than four layers unless you use aids.
Step 6: Do a movement test. Walk, turn your head, and reach forward. If chains bunch or slide, adjust the spacer placement or switch a piece to a slightly different length.
| Step | Action | Why it matters |
|---|---|---|
| 1 | Pick focal necklace | Anchors the entire look |
| 2 | Choose supporting strands | Adds depth without clutter |
| 3 | Arrange by length | Catches issues before wearing |
| 4 | Dress from neck down | Prevents tangling during dressing |
| 5 | Add spacer or clasp aid | Holds layers in place all day |
| 6 | Movement test | Confirms real-world comfort |
For more creative combinations, check out our layering necklace tips to see what experienced stylists are doing with mixed metals and pendant placement in 2026.
Pro Tip: Fasten all your necklaces before putting them on by connecting the clasps and slipping the entire set over your head. This trick alone cuts dressing time in half and keeps chains from crossing.
Troubleshooting: Common layering mistakes and how to fix them
Even a perfect workflow hits snags — let’s tackle the most common necklace layering issues and reveal expert solutions.
Problem: Chains keep tangling mid-wear. Quick fix: use a necklace spacer or layer clasp at the back of your neck. If you don’t have one, try loosely braiding the clasps together. You can also find essential necklace tips that cover tangle prevention in practical detail.
Problem: The look feels cluttered and heavy. This usually means too many similar weights are competing. Remove one piece — often the middle layer — and the stack suddenly breathes. Odd-numbered groupings (3 or 5 necklaces) tend to feel more balanced than even numbers.
Problem: Metals look mismatched in a bad way. There’s a difference between intentional metal mixing and an accidental clash. If you’re mixing gold and silver, add a third piece that incorporates both tones, like a two-tone chain or a gemstone pendant in a mixed-metal setting. This bridges the gap and makes the mix look deliberate.
Problem: Two necklaces of the same length keep crossing. Here’s the surprising fix: swap one for a piece with strong texture contrast. As expert stylists note, same-length layers can work beautifully when texture contrast is strong enough — some even embrace the result as intentional “neck mess.” For those who prefer precision, master layering covers technical fixes for exactly this scenario.
“Same-length layers work with strong texture contrast; some style ‘neck mess’ as organic, while others engineer solutions for all-day wear.” — AOL Style
Common layering mistakes to avoid:
- Putting on necklaces one at a time without planning the order
- Using all statement pieces with no minimalist anchor
- Ignoring neckline — a high crew neck makes most layering invisible
- Skipping the movement test before leaving home
- Adding too many pendants at similar drop lengths
The truth is, troubleshooting layering problems gets faster with practice. Each time you identify an issue and fix it, you add a technique to your personal toolkit that sticks.
Verifying your layered look: Style checks and confidence boosters
After fixing issues, the final step is making sure your layered necklaces look and feel as intended — here’s how to check and finish with confidence.
Your final verification checklist:
- Visual balance check. Stand two feet from a full-length mirror. Can you see each distinct layer? If two chains blend together, swap one for a different texture or adjust the length.
- Comfort check. Are clasps digging into your neck? Is any chain pulling uncomfortably? Reposition clasps toward the back or add an extender for relief.
- Neckline compatibility. Your top’s neckline should frame, not compete with, your stack. V-necks work beautifully with longer pendants; crewnecks suit chokers and short chains best.
- Movement test. Walk across the room, sit down, and tilt your head. If everything stays in place, you’re set.
- Lighting check. Look at your stack in natural light if possible. Jewelry catches light differently than under bathroom bulbs, and you want to confirm the metals complement your skin tone.
For all-day wear, some women prefer to engineer their layering with spacers and clasps, while others prefer a more organic arrangement. Neither is wrong — it depends on your lifestyle and how much movement your day involves.
Look at elevating layered looks for ideas on taking a functional stack and turning it into a signature style moment. And when you’re ready to experiment with outfit pairings, styling layered necklaces is a great next read.
Pro Tip: Take a quick photo of layering combinations that work. You’ll build a personal lookbook over time, so re-creating your best stacks takes seconds instead of starting from scratch every morning.
For durability and long-term comfort:
- Store layered sets separated in a jewelry organizer, not tangled in a drawer
- Remove necklaces before swimming, showering, or heavy exercise
- Clean chains regularly to prevent dullness from skin oils and products
- Inspect clasps monthly — a weak clasp loses a necklace before you notice
A stylist’s honest take: Layering jewelry beyond the rulebook
Here’s something most guides won’t tell you: the women who pull off the best layered looks aren’t always the ones following every rule. They’re the ones who know why the rules exist and then decide what to keep.
There’s a whole camp of stylists who treat layering as precision engineering — spacing measured, clasps secured, textures carefully calibrated. And then there’s the “neck mess” camp, where chains cross and tangle intentionally, creating something raw and personal. Both are valid. Both look incredible when worn with genuine confidence.
What separates a great layered look from a mediocre one isn’t the price of the jewelry or the number of pieces. It’s intentionality. Even a seemingly imperfect stack reads as stylish when it clearly reflects the person wearing it. As Vogue points out, layering expresses individuality and isn’t about following rules but rather principles that ensure polish.
Our honest advice: learn the workflow, internalize the principles, and then give yourself permission to break them. Check out curated layering advice for more perspective on how real women are doing this beautifully on their own terms. Confidence is the one accessory you genuinely cannot buy.
Elevate your layering game with Malibu Vibes Jewelry
Now that you’ve got the workflow down, the right pieces make all the difference. At Malibu Vibes Jewelry, we design and handcraft necklaces in Los Angeles specifically with versatile, layerable styling in mind.

Whether you’re drawn to clean, minimalist chains or want a bold pendant as your focal piece, our sterling silver collection is a great place to start your stack. For a pop of color and personality, explore our color gemstone necklaces — these make stunning focal pieces that anchor any layered look. Curious about how our pieces are made? Learn about our jewelry making process and see why quality craftsmanship translates directly into pieces you’ll wear every day.
Frequently asked questions
How many necklaces can I layer without tangling?
Most experts recommend sticking to up to four necklaces before tangling becomes a real issue. Beyond that, tangling is inevitable unless you use layering aids like spacers or multi-strand clasps.
Can I mix metals or should I stick to one color?
Mixing metals is absolutely on-trend and adds great depth to a layered look. Just make sure there’s a unifying element — a shared texture or one piece that bridges both tones — because no strict rules apply, but principles keep the result polished rather than cluttered.
What tools help keep necklaces secure?
Necklace spacers, extender chains, and layered clasps are the most effective options. As style experts confirm, some prioritize engineering with spacers and clasps to ensure necklaces stay in place through a full day of wear.
How do I make a layered look work with different necklines?
Match your shortest necklace to the neckline’s shape — V-necks pair naturally with longer pendants, while crewnecks suit chokers and shorter chains that sit above the fabric and create visible contrast.
Is it okay for layers to look messy or imperfect?
Absolutely. The “neck mess” style is embraced by stylists as an organic, personality-driven approach to layering — intentional imperfection is a valid and stylish choice.
Recommended
- How to Style Layered Necklaces for a Chic Look – Malibu Vibes Jewelry
- Master layering necklaces: elevate everyday and special looks – Malibu Vibes Jewelry
- Master your look: a stylish guide to layering necklaces – Malibu Vibes Jewelry
- Master the art of layering necklaces: top tips for 2026 – Malibu Vibes Jewelry
- Top Jewelry Safe: Secure & Stylish Protection – Safes and Security Direct